

The raised tail and little white socks tell you exactly which end of the cat you are looking at. This crochet cat butt pattern turns that familiar pose into a funny three-dimensional charm, with a round body, shaped legs and a white-tipped tail. It is the sort of handmade gift that needs the right recipient and very little explanation.
The project fits the cat-lover side of PetsCrochet as a novelty accessory for people. Its intended uses are a keychain, brooch or small display piece. The filled body and attached details do not make it a pet play toy.
1. A Cat-Butt Charm with White Socks

The main body is worked in a muted brown, while white lower legs and a white tail tip keep the small shape easy to read. Pink stitches finish the paws. Two small rounded anatomical details and the centre shaping give it the deliberately cheeky look.
There is only one design here. The grey working photographs show its construction at different stages, while the brown photographs show the finished version. They are useful views of the same project, not extra patterns.
The body begins as one rounded piece

Single-crochet increases build the curved top, then offset shaping broadens the hips. A run of even rounds adds depth before the lower edge narrows. Keeping the marker in place matters: the later decreases and leg division rely on knowing where the round starts.
The legs grow from the body opening

After the body reaches 50 stitches, each leg uses 25 of them. Work one leg down to its closed paw, then return to the other half. The guide includes an explicit marker map for this division so you can check both openings before continuing.

Change to white at the same round on each leg. Compare the feet before closing the second one, and add the body filling while there is still enough room to reach inside. The lower legs should match in length without being packed so firmly that the crochet stretches.
The tail gives the silhouette its character
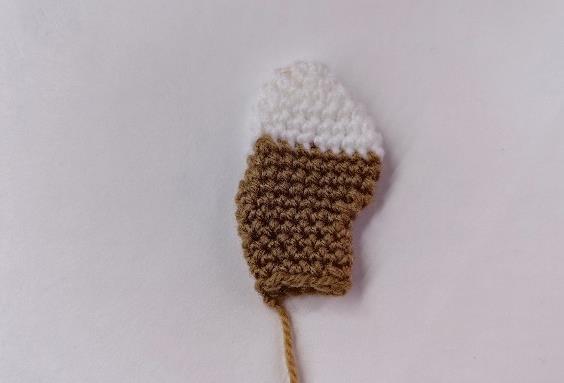
The tail uses increases and decreases at different positions to create its bend. It is sewn across the upper body, with the curve pointing upward. Pin the whole base in place first and compare it with the finished view before sewing.
One tail round has a conflicting written placement and stitch count. The PDF marks the draft correction beside that round, rather than leaving the next step with an unexplained extra stitch.
Small finishing details complete the joke
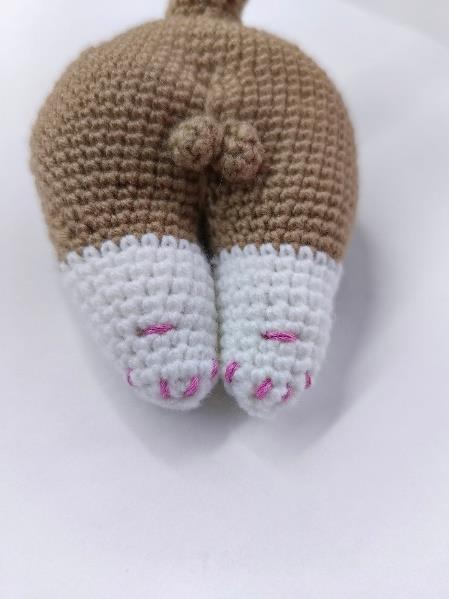
Keep the pink paw embroidery short and anchor every end inside the fabric. The small rounded pieces are made separately and sewn against the body. If you prefer a plainer rear-view charm, the guide explains that these anatomical details can be omitted. That choice changes the finish, not the base body schedule.
What the free PDF includes
The complete body, both legs, tail, rounded details, assembly, an illustrated leg-division map and all 14 supplied reference photographs. Proposed keyring-tab and brooch-pad instructions are included as optional finishes. Their hardware, fit and durability have not been tested or photographed.
Choose a finish for the person receiving it
| Finish | What to check |
|---|---|
| Small display charm | Finish the crochet and keep all pieces secure. |
| Keychain | Trial-fit the proposed short tab around a closed split ring and sew it to the body. |
| Brooch | Measure the proposed backing pad, then choose a locking sew-on bar that fits it. |
The photographs show the crochet charm without its final accessory hardware. Attach a ring or brooch bar to sound body fabric, using the proposed backing method in the guide. The tail and small details are not attachment points. A finished accessory still needs its own wear and fastening checks.
Materials, size and making experience
The starting materials name YarnArt Jeans, a 2 mm hook and polyester toy filling. The reference lists a finished size of about 10 cm, but does not define exactly where that measurement begins and ends. Measure your own sample from the lowest paw to the tail tip and record the body width separately.
This is an intermediate project with spiral rounds, offset shaping, decreases, a leg split and sewing. It has no measured making time or yarn quantity. Use a sample to check the fabric and estimate what your chosen yarn will require.
The guide is a prototype-ready editorial draft. Its stitch arithmetic has been checked, but no new physical crochet sample, wash test or attachment test has been completed. Follow the care labels of the actual yarn and filling, and test cleaning on a separate sample first.
How this relates to pet toys
This is a gift for someone who likes cats. Keep the finished charm, stuffing, pins, hardware and sewing scraps out of pet access. Yarn strands and small pieces that come loose can be swallowed, and a securely sewn novelty accessory has not been assessed as a play toy.
If you came looking for something for your cat to bat, chase or carry, choose a design specifically intended for that use and assess its construction for your own pet. Adding catnip or taking off a keyring would not establish that this charm is suitable for play.
Questions before you start
Is this a cat-butt coaster?
No. It is a filled, three-dimensional charm with two legs and a separate tail. It is not designed to sit flat under a cup.
Are the grey and brown versions different patterns?
They are construction and finished references for the same design. The free PDF keeps them together.
Can I leave off the small anatomical pieces?
Yes. Finish the body, legs and tail, then omit the two separate rounded pieces. The result is a simpler rear-view cat charm.
Does the guide show a finished keychain?
The supplied photographs show the crochet charm. The guide adds a proposed keyring tab and brooch backing, which still need trial fitting and testing.