

The big ears and little beige muzzle give this Chihuahua plenty of expression before you add the bandana. This free Chihuahua crochet pattern makes a small stuffed puppy with dark markings, pale lower legs and a red scarf sized just for the figure.
It is a good project to consider if you enjoy animal amigurumi and want to practise colour changes on a small scale. The PDF covers the puppy and bandana, with genuine making photos for the face, ears, assembly and finishing.
1. Chihuahua Puppy with a Tiny Bandana
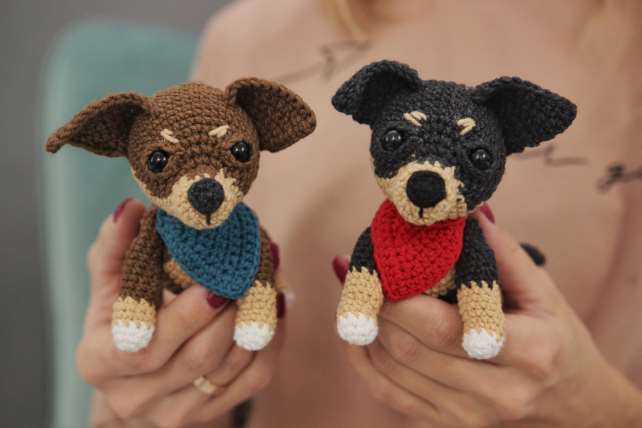
The head is the feature to spend time on. A beige muzzle grows into a dark head with a small pale patch, while chain-based eyelids and embroidered brows soften the expression. Separate triangular ears sit wide across the top.
The small body has a beige chest patch and four attached limbs. White tips finish the front paws; the longer back legs begin in beige. An unfilled tail and a tiny buttoned bandana complete the look.
A small project with careful finishing
The original sample is about 12 cm, or 4.7 inches, tall with YarnArt Jeans and a 2 mm hook. That is a reference size, since yarn and tension will affect your result. The brown puppy is a colour reference for the same construction, rather than a second separately graded pattern.
This is an intermediate project. The single crochet itself is familiar, but the colour changes, shaped face, small sewing and thread-fastened limbs need attention. It suits someone who is comfortable making and assembling separate amigurumi pieces.
The face starts with colour changes
The head begins at the beige muzzle. As it expands, dark stitches form a patch that grows into the top and back of the head. Keeping the colour boundaries in the right places gives the muzzle its shape without adding a separate beige face panel.

Mark the first stitch and count each colour block before moving on. Change yarn on the final pull-through of the preceding stitch so the next stitch starts in the intended colour. The making photos show the work from both sides, including the ends inside the head.
The eye placement comes before the head closes. Leave the small nose, eyelids and brows for a slower finishing session, when you can compare the two sides from the front. A tiny shift can change the expression quite a bit.
Check the ears and head before attaching the limbs
The ears are worked as rows and sewn on separately. Pin them in position, look from above and check their spacing before committing to the seam. The photos show the pinned stage as well as the head from the back.
For the body, a beige chest patch breaks up the dark fabric. The head is sewn to the body, then the paired limbs are attached with thread fastening. The guide explains that thread route in writing, so you can study it alongside the marked assembly photos.
Keep the attachment landmarks straight: some are counted from the top and others from the starting ring. Mark both sides before passing a needle through the body. This helps you compare the leg and arm positions while the parts can still be moved.
The bandana belongs to the crochet puppy
The red bandana starts as a little triangle, then gains edging and two narrow tabs. One tab includes a loop for the button. It is a small accessory, but the contrast against the dark yarn makes it stand out in the finished figure.

The corner turns and top-edge placement are easier to follow with the making photos open. The PDF gives an explicit draft route for those transitions and keeps the reference sequence alongside it. Check the bandana on your own figure before sewing on the button.
This accessory is sized for the amigurumi. It is not a pattern for a real Chihuahua’s collar or bandana.
Materials to gather
- YarnArt Jeans or a compatible smooth yarn: anthracite, light beige, black, white and red.
- A 2 mm hook as the starting point, adjusted after checking the fabric.
- Stuffing, a pair of 10 mm eye fittings and one 10 mm button.
- Stitch markers, scissors, assembly pins and needles for sewing and embroidery.
The reference yarn is supplied as 50 g per 160 m. The pattern does not give measured consumption for each colour, so a ball specification is not a promise that one ball makes the whole puppy. Check your actual yarn labels and record what your sample uses.
Work a small stuffed trial before starting the full head. The fabric should hold the filling without gaps opening under light pressure. Keep the yarns compatible across the colours so the head, limbs and bandana remain in proportion.
A handmade make for a Chihuahua lover
This little dog fits naturally into a crochet animal collection or a handmade display gift for someone who loves Chihuahuas. You can keep the red bandana shown in the guide or choose another colour, while remembering that a different yarn may change its fit.
The figure includes stuffing, eye fittings and a small button. Keep it out of reach of real pets and anyone likely to mouth loose parts. It has not been tested as a chew toy, child’s toy or washable finished product.
Follow the actual materials’ care labels. Test a cleaning method on samples first, then check the embroidery, joints and small attachments again after cleaning.
Questions before you start
Is this a beginner Chihuahua crochet pattern?
It is better suited to an intermediate maker. The colour blocks, eyelids, separate ears and thread-fastened limbs add more detail than a first amigurumi project.
Does the free PDF include the bandana?
Yes. It includes the puppy, tail and bandana, with the full reference pages and making photos after the fresh reading guide.
Are the brown and dark puppies two patterns?
They are two colour references for one puppy design. The written colour schedule follows the anthracite and beige version with the red bandana.
Is the puppy made without sewing?
No. It has a sewn head, ears and nose, stitched face details and attached limbs. The tail and bandana finishing also need attention.
Will mine finish at exactly 12 cm?
The 12 cm measurement belongs to the original sample. Your yarn, hook, tension and filling will affect the result. Check the head and body proportions as you work.
Have the guide clarifications been physically tested?
No new sample has been made. The bandana edging interpretation and added assembly explanations are prototype-ready details to check in yarn.
Start with the muzzle and keep the colour marker visible. Once the face and ears are in place, you will have a useful reference for positioning the rest of this little puppy.