


It takes only a few details to make a crochet pug look like a pug. Start with a broad fawn head, place the charcoal muzzle low, and fold the ears forward. The brows and curled tail finish the expression. This crochet pug amigurumi has a fixed standing pose for a shelf or desk.
1. Crochet Pug Amigurumi

The free guide uses separate pieces for the head, body and paws. The reference pug has more pronounced sculpting and a poseable body. This version uses yarn, filling and sewn seams, with the eyes and nose stitched in place.

Give the pug its expression

Pin the muzzle first, then mark the eyes before threading your needle. A small shift changes the expression more than you might expect. Work the brow folds in fawn yarn so the texture catches the light without competing with the dark face.
Check the stance before closing the seams

Pin all four legs to the body and rest the pug on a level table. Once the head is in place, look from the front and side. If one paw lifts, adjust its angle before sewing. The fuller hind legs give the rump its shape.
Coil the tail against the rump
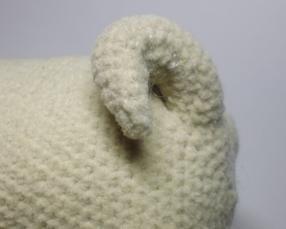
Working two stitches in each foundation chain makes the strip curve. Follow that curve into a small coil and tack it before attaching the tail. Keep the curl close to the body so it reads clearly in profile.
Questions before you start
What skills do I need?
The pieces use single crochet, increases and decreases. Sewing the legs level and placing the face take the most care. The PDF shows the assembly order with photos of the original parts and an illustrated layout for the standing version.
How big will the pug be?
The new draft has no tested dimensions. Start with the suggested yarn and hook, check the swatch, and record the actual size after sewing. The photos show the original design and its proportions.
Does the tail need wire?
The tail curls through increases and holds its shape with a few sewn tacks. Use the finished pug as a display piece.