


A realistic cat crochet pattern asks you to look beyond the round head and pointed ears. Here, the separate white muzzle, narrow nose bridge and shaped legs build a standing feline silhouette. Painted tabby markings add the last layer of detail.
This is one advanced display-cat project with eye and tail options. The free PDF covers the crochet pieces, sewing, finishing and genuine assembly references. It is an untested prepared guide, with the count clarifications identified where they apply.
1. A Standing Tabby Cat with a Sculpted Face

The figure has a long oval body, four shaped limbs and a tail that follows the chosen pose. Its expression comes from several small decisions: how much filling sits behind the muzzle, the angle of the ears, the eye shape and the way the head joins the neck.
Build the muzzle in layers

The upper white snout is lightly filled and sewn to the lower front of the head. A smaller flattened piece sits underneath, while a narrow grey bridge reaches toward the forehead. A shaping thread defines the centre of the muzzle.
Those pieces need careful positioning before the seams become permanent. Check the face from more than one angle, and use the photos to understand the shape rather than expecting a single stitch coordinate to determine the expression.

Choose the eye finish
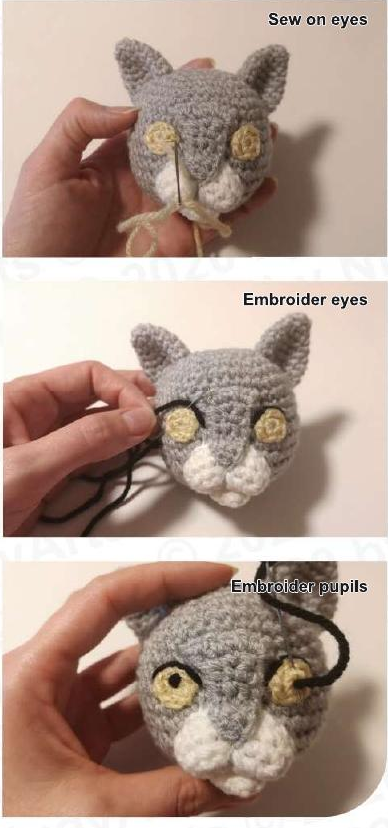
The main guide uses crocheted eye-colour disks with black embroidered detail. A fully embroidered option gives another way to build the expression. Neither choice needs a glued-on eye in the prepared route.
The reference also offers a fuller head variation. It belongs to the same design, but it changes the proportions, so the face and head-to-neck join need another visual check.
Shape the chest and legs before choosing the stance

The body begins as an oval and grows in spiral rounds. Short rows build the chest before the neck returns to full rounds. The guide makes the chest-to-neck anchor allocation explicit to resolve a count mismatch in the supplied wording.
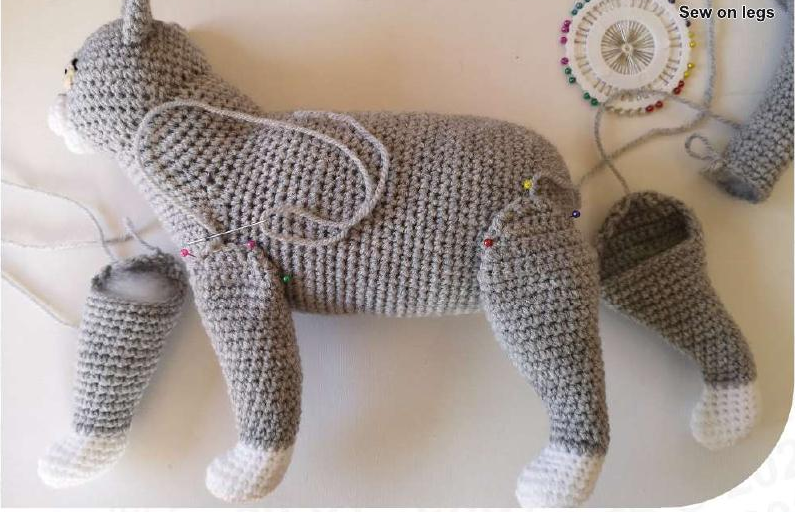
The front and hind legs have different shaping and tapered caps for attachment. Baste them first, then check the paws on a level display surface. A walking-like offset can change the balance as well as the pose; the finished photo does not establish that every sample will stand unaided.
Paint the tabby markings after assembly

The stripes are painted onto the completed grey crochet. They are not a hidden colour-change sequence in the body rounds. Practice on spare crochet made from the same yarn, then build thin irregular marks with a lightly loaded brush.
The plain grey and painted tabby versions are finishing choices, and the raised and hanging tails are pose options. They do not turn this into a collection of separately tested patterns.

Materials and experience
The reference uses light DK acrylic yarn at approximately 133 m per 50 g and a 2.5 mm hook. Grey is the main colour, with white, black and an eye colour for the details. Its approximate reference height is 26 cm; your yarn, tension, filling and seams can change that.
You need to be comfortable with spiral rounds, oval starts, short rows, decreases and sewing shaped pieces together. This is a project to work through carefully, with samples for the face, tail bend and paint, rather than a first amigurumi lesson.
Finish it for display
Keep the figure away from pets that might chew, pull or swallow yarn or filling. It is a decorative cat amigurumi, separate from toys intended for a real cat. Remove every temporary pin and marker, inspect the seams and allow paint to cure according to its own instructions.
No independent crochet, wash, paint or balance test has been completed for this guide. Follow the actual yarn, filling and paint requirements together, and test any cleaning on a spare painted swatch.
Questions before making it
Are the stripes crocheted?
No. The tabby finish is painted after assembly. You can also explore the unpainted grey finish shown in the references.
Does the tail need wire?
The prepared guide uses crochet, filling and sewing without an internal armature. Tail position and rigidity still need checking on the sample.
What has been clarified in the instructions?
The guide explains counted oval foundations, the chest-to-neck join, the tail-bend route and the hanging-tail count allocation. The changes are marked as untested interpretations.
Does the PDF include the whole figure?
Yes. It covers the head, muzzle, ears, eyes, body, chest, neck, all four legs, tail options, assembly and optional painted finish, with extracted photo and chart panels.